Want A Forum Or A Blog Like This? Click Here | Call us With: 07069039666 | BBM PIN: 5922C082

5 Mozilla Firefox Add-ons For Every Web Developer


Add-ons applets used to extend the functionality of a program/software. Mozilla firefox browser have lots of add-ons and extensions that can be used to extend its functions as a web browser for a better web browsing experience. Below are some add-ons and extensions that is a must have for every web developer/ programmers:

50 Windows 8 tips AND tricks you surely need to know by now

Dear windows 8 lover/user,

Today i will be sharing with you 50 Tips and Tricks you surely need to know about windows 8. Please seat back, relax and have a wonderfully exploring.

How To Reset Pattern Lock Or Password Lock On Android Without Factory Restore

Have you forgotten your Android phone lock pattern or lock password, Or someone tried to open your phone and exceed the maximum number of tries?

10 THINGS YOU SHOULD KNOW BEFORE BUYING A POWER BANK

Thinking of  buying a power bank so as to be able to keep your phone or laptop alive after a major power outage, or you live in an area with epileptic or no power supply? Well here are 10 things i feel you should know about power banks before buying one.

Meet The New Gionee S6

 The recently released Gionee S6 is now making waves as one of the latest smart phones to watch for this 2016.


This device currently has Gold, Silver, and Rose Gold color options in stock. As for the price, the handset carries a price tag of $295 at current exchange rates.

Specs-wise, the Gionee S6 is powered by a MediaTek MT6753 SoC with 1.3GHz octa-core CPU and Mali T-720 GPU, and sports a 5.5-inch 720p AMOLED display. It has 3GB RAM and 32GB expandable internal memory, and packs in a 3,150mAh battery.

In terms of camera, the phone features a 13MP rear unit and a 5MP front shooter. It is just 6.9mm thick, and runs Android 5.1 Lollipop with the company's AMIGO OS 3.1 on top. Watch for more high end phones from Gionee

5 Quick Youtube Shortcuts : Must Try

Most of us like watching videos on Youtube, but we usually find it awkward navigating through the inbuilt media control.

Worry no more if you are in this category of people. These shortcuts works on Windows, Mac, Linux, also on Chrome, Firefox and Microsoft Edge. They also work on Youtube videos embedded on other websites, but their behavior might be unpredictable sometimes.


The Youtube Shortcuts

L Key

 This key takes the video forward by 10 seconds.

J Key 

Pressing the J key takes the video backward by 10 seconds.

K Key

This key allows you to play/pause Youtube videos. Found between the J and K keys, it acts like the play/pause button found in media player control in most keyboards.

1-9 Keys

This key allows you to skip to certain percentage in the video. So pressing 1 takes you 10% into the video and 3takes you 30%  into the video, etc.

0 Key

The 0 Key takes you to the beginning of the video. This works when the video is playing and  when it is paused.

Why not give this awesome shortcuts a try?


How To Use Whatsapp As A Search Engine And Wikipedia : Must Try


WhatsApp is a great mobile app. It’s easy to use, and is loaded with features for multimedia and group communication, and for 1 billion users, it has become one of the most convenient ways to communicate in a cheap, fast and effective way.

However, some group of people have decided to look beyond all this and add more functionality to WhatsApp. This group from India created a WhatsApp bot which allows its users to access certain services ordinarily accessible on the internet only and not through WhatsApp.

Through this bot, Whatsapp users now can search for content on Wikipedia, access some news articles and even engage in simple mobile quizzes. To access the bot services, users need to save any one of a list of specific phone numbers and add this number to a new or existing WhatsApp group.

Wiki-WhatsApp-bot After that services are accessed by typing specific commands as ordinary messages on group chat. For example Wikipedia searches can be prompted by typing Wiki followed by the search item, and sports news is available by typing certain reference numbers.

 How to activate this Bot

To activate this awesome feature on your whatsapp, just save any of the numbers i listed below with any name of your choice to your contact.

+919043489211 
+917200037454
+919043489211
+917823996693
+919043535738
+919841916290
+919841918127
+917823996903
+917823997158
+917200037284

Create a Whatsapp group chat and add the named number to it
Add friends and relatives to the group or enjoy the services alone.

Use the following to access the search engine
  • Type wiki SEARCHTERM on the group and you will get Wikipedia information for that SEARCHTERM (e.g - Wiki Oxygen) and send it to the group.
  • Want to use the Dictionary, Type +DICT with the word you want to check (e.g - +DICT Oxygen) and send it to the group.
  •  For news channel updates, type +NEWS and you will be subscribed to the NEWS channel. To unsubscribe, type -NEWS and you will be unsubscribed.
  • For Live Football scores and updates, type +FOOTBALL to subscribe and -FOOTBALL to unsubscribe.
1. Type wiki SEARCHTERM on the group and you will get Wikipedia information. 2. Want to use dictionary – Type +DICT with the word you want to dictionary (e.g. – +DICT SARCASTIC) and send it to the group. 3. For the new channel updates, Type +NEWS and send it to the group. You will get subscribed. To unsubscribe, Type: -NEWS. 4. For GK play, send +GK to the group and for Football and cricket send +FOOTBALL and +CRICKET to the group.

1. Type wiki SEARCHTERM on the group and you will get Wikipedia information. 2. Want to use dictionary – Type +DICT with the word you want to dictionary (e.g. – +DICT SARCASTIC) and send it to the group. 3. For the new channel updates, Type +NEWS and send it to the group. You will get subscribed. To unsubscribe, Type: -NEWS. 4. For GK play, send +GK to the group and for Football and cricket send +FOOTBALL and +CRICKET to the group.

1. Type wiki SEARCHTERM on the group and you will get Wikipedia information. 2. Want to use dictionary – Type +DICT with the word you want to dictionary (e.g. – +DICT SARCASTIC) and send it to the group. 3. For the new channel updates, Type +NEWS and send it to the group. You will get subscribed. To unsubscribe, Type: -NEWS. 4. For GK play, send +GK to the group and for Football and cricket send +FOOTBALL and +CRICKET to the group.


No spam! No charges! Completely Free! Don't wastetime start searching.
I hope you enjoy this.

Gionee Unveil The New Marathon M5 Mini

After launching Marathon M5 lite last month, Chinese smartphone manufacturer Gionee has unveiled a mini variant of its Marathon M5 smartphone. The device is powered by a Mediatek MT6580 SoC and sports a 5-inch (1280 x 720 pixel resolution) IPS display.

 Image result for gionee Marathon M5 mini pic

Gionee Marathon M5 mini sports a 2GB RAM and 16GB expandable internal memory, and packs in a large 4,000 mAh battery that is ideal for gaming and multitasking. In terms of camera, the M5 mini comes with an 8MP rear and a 5MP front shooter. Measuring 143.5 x 71 x 9.6mm, the handset runs on Android 5.1 Lollipop with Amigo UI 3.1 on top. Connectivity options include 3G, GPS, Bluetooth, and Wi-Fi.

Commenting on the launch, the company's Nigeria Marketing Director Somoye Habeeb said, "Gionee focuses on innovation, efficiency and affordability in ways that other brands don’t. Having received a warm reception from the Nigerian market when we introduced the Gionee M5 a few months ago, Gionee is following up with the M5 Mini."

"The Gionee M5 Mini as the name implies, is a compact version of the M5. It is just as effective and stylish, but more affordable. It can be considered a sequel to the highly durable M5, and is the latest phone to be released in Nigeria," he added.

There was, however, no word on the M5 mini's price.

Stay tuned as we shall bring you more info on it price and specification.

How to Unlock Your Android Phone’s Bootloader, the Official Way

Unlocking your Android phone’s bootloader is the first step to rooting and flashing custom ROMs. And, contrary to popular belief, it’s actually fully supported on many phones. Here’s how to unlock your bootloader the official way.

Not Every Phone Will Let You Do This

There are two kinds of phones in this world: Those that let you unlock your bootloader, and those that don’t.
Whether you’re allowed to unlock your bootloader depends on the manufacturer of your phone, the model you have, and even your carrier. Nexus phones are all unlockable by nature, and many phones from Motorola and HTC allow you to unlock your bootloader through a similar process as the Nexus.
Other phones, however–and some carriers–don’t allow you to unlock your bootloader the official way, which means you have to wait for developers to exploit a security vulnerability if you want to root and flash ROMs. If you have one of those phones, this guide will sadly not help you.
The best way to find out which category your phone falls into is to browse its section at XDA Developers. If you have an HTC or Motorola phone, you may be able too research its unlockability on HTC or Motorola’s website. If it doesn’t support unlocking, you’ll have to use an unofficial unlocking or rooting method, which you’ll usually find on the XDA Developers forums.
If your phone does support unlocking through more official channels, read on.

Step Zero: Back Up Anything You Want to Keep

Before we begin, it’s important to mention: this process will erase all of your data. So if you have any photos or other files on your phone that you want to keep, transfer them to your computer now. In addition, if you have any app settings you want to keep, use their backup function to create a backup settings file, and transfer those to your computer as well.
Here’s an extra tip: Since I know I’m eventually going to root my phone, I always unlock my bootloader as soon as I buy a new device. That way, I don’t waste time setting it up only to erase the phone in a few days and do it all over again. If you’re an obsessive Android tweaker who knows you’re going to root soon, consider unlocking before you go through the trouble of setting up your phone.
When you’ve backed up everything you want to keep, continue with the steps below.

Step One: Install the Android SDK and Your Phone’s Drivers

screenshot.1
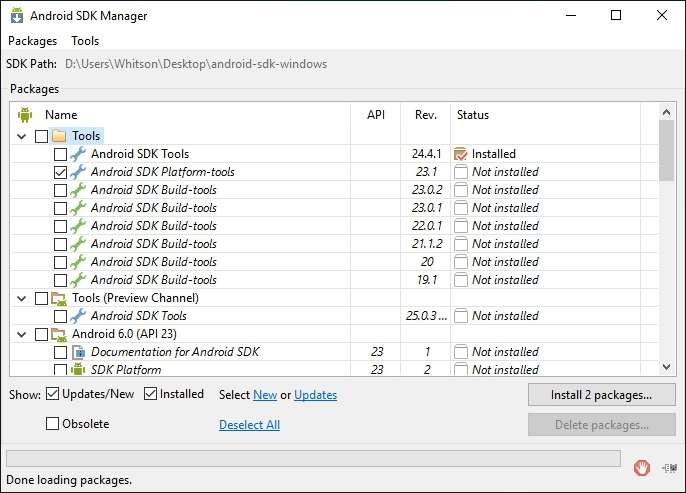
You’ll need two things for this process: the Android Debug Bridge, which is a command line tool for your computer that lets you interface with your phone, and your phone’s USB drivers. Even if you’ve installed these before, you should get the latest versions now.

  1. Head to the Android SDK download page and scroll down to “SDK Tools Only”. Download the ZIP file for your platform and unzip it wherever you want to store the ADB files.
  2. Start the SDK Manager and deselect everything except “Android SDK Platform-tools”. If you are using a Nexus phone, you can also select “Google USB Driver” to download Google’s drivers.
  3. After it’s finished installing, you can close the SDK manager.
  4. Install the USB drivers for your phone. You can find these on your phone manufacturer’s website (e.g. Motorola or HTC). If you have a Nexus, you can install the Google drivers you downloaded in step 2 using these instructions.
  5. Reboot your computer if prompted.
Turn on your phone and plug it into your computer using a USB cable. Open the platform-tools folder in your Android SDK folder and Shift+Right Click on an empty area. Choose “Open a Command Prompt Here”, and run the following command:
adb devices
If it shows a serial number, your device is recognized and you can continue with the process. Otherwise, ensure you’ve performed the above steps correctly.

Step Two: Enable USB Debugging

usb_debugging

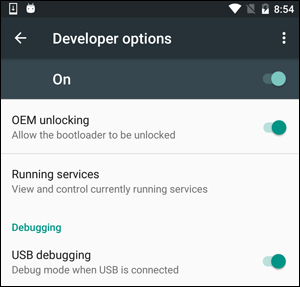
Next, you’ll need to enable a few options on your phone. Open your phone’s app drawer, tap the Settings icon, and select “About Phone”. Scroll all the way down and tap the “Build Number” item seven times. You should get a message saying you are now a developer.
Head back to the main Settings page, and you should see a new option near the bottom called “Developer Options”. Open that, and enable “OEM Unlocking”, if the option exists (if it doesn’t, no worries–it’s only necessary on some phones).
Next, enable “USB Debugging”. Enter your password or PIN when prompted, if applicable.
Once that’s done, connect your phone to your computer. You should see a popup entitled “Allow USB Debugging?” on your phone. Check the “Always allow from this computer” box and tap OK.

Step Three: Get an Unlock Key (for Non-Nexus Phones)

If you’re using a Nexus device, you can skip the following step. Non-Nexus devices will likely need to go through one extra step before you continue.
Head to your manufacturer’s bootloader unlocking page (for example, this page for Motorola phones or this page for HTC phones), choose your device (if prompted), and log in or create an account.


unlock_page


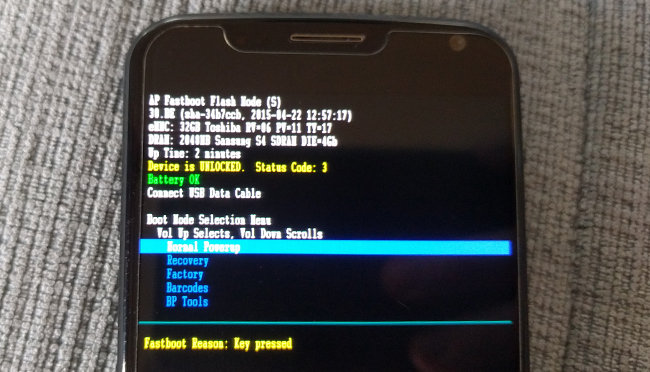
The rest of this step is a bit different depending on your phone, but the manufacturer’s site should walk you through the process. It will go something like this: First, turn off your phone and boot into fastboot mode. This is a bit different on every phone, but on most modern devices, you can get there by holding the “Power” and “Volume Down” buttons for 10 seconds. Release them, and you should be in fastboot mode. (HTC users will need to select “Fastboot” with the Volume Down key and press power to select it first.) You can usually find more information on your specific phone with a quick Google search, so feel free to do that now before continuing.

2016-01-21 15.03.50


Connect your phone to your PC with a USB cable. Your phone should indicate that the device is connected. On your computer, open the platform-tools folder in your Android SDK folder and Shift+Right Click on an empty area. Choose “Open a Command Prompt Here”, and use that Command Prompt window to retrieve your unlock key as described by your manufacturer. (For example, Motorola phones will run the fastboot oem get_unlock_data command, while HTC phones will run the fastboot oem get_identifier_token command.)


unlock_data


The Command Prompt will spit out a token in the form of a very long string of characters. Select it, copy it, and paste it into the applicable box on your manufacturer’s website–make sure there are no spaces!–and submit the form. If your device is unlockable, you’ll receive an email with a key or file that you’ll use in the next step.
If your device is not unlockable, you’ll get a message stating so. If you want to root your device or flash a ROM, you’ll need to use a more unofficial method, which you can usually find on a site like XDA Developers.

Step Four: Unlock Your Phone

Now you’re ready to actually perform the unlock. If your phone is still in fastboot mode, run the command below. If not, turn off your phone and hold the “Power” and “Volume Down” buttons for 10 seconds. Release them, and you should be in fastboot mode. (HTC users will need to select “Fastboot” with the Volume Down key and press power to select it first.) Connect your phone to your PC with a USB cable.
On your computer, open the platform-tools folder in your Android SDK folder and Shift+Right Click on an empty area. Choose “Open a Command Prompt Here”.
To unlock your device, you’ll need to run one simple command. For most Nexus devices, this command is:
fastboot oem unlock
If you have a newer Nexus, such as the Nexus 5X or 6P, the command will be slightly different:
fastboot flashing unlock
If you have a non-Nexus device, your manufacturer will tell you what command to run. Motorola devices, for example, need to run fastboot oem unlock UNIQUE_KEY, using the unique key from the email you received. HTC devices will run fastboot oem unlocktoken Unlock_code.bin using the Unlock_code.bin file you received from HTC.
After running the command, your phone may ask if you are sure you want to unlock. Use the volume keys to confirm.


fastbootunlock


When you’re finished, use the on-screen menu to reboot your phone (or run the fastboot reboot command from your PC). If everything worked correctly, you should see a new message at boot stating that your bootloader is unlocked, and after a few seconds it should boot into Android. It’s important that you boot into Android before doing anything else, like flashing a custom recovery.
Congratulations on unlocking your phone! You won’t notice much of a difference yet, but with an unlocked bootloader you’ll be able to flash a custom recovery, opening the door to root access and custom ROMs.

Source:How-To Geek

Elephone P9000 Review and Specifications

Put your hands together and gladly welcome this "monster" android device. The Elephone P9000 Lite with 4GB Ram, 32 GB internal memory running on stock Android 6.0 Marshmallow with support for OTG type-C.
See the main features below.

Main Features:
Elephone P9000 Lite 4G Phablet 5.5 inch Android 6.0 MTK6755 Octa Core 2.0GHz FHD Screen 4GB RAM 32GB ROM 13.0MP Main Camera OTG Type-C
Display: 5.5 inch 1920x1080 1080p LTPS OGS screen
CPU: MTK6755 ( Helio P10 ) Octa Core 2.0GHz, GPU: ARM Mali-T860
System: Android 6.0 Marshmallow
Memory:RAM + ROM; 4GB RAM + 32GB ROM (Available memory about 26GB)
Camera: 5.0MP Front camera + Rear camera 13MP with auto focus and double color temperature flashes

Bluetooth: 4.0
GPS: GPS, A-GPS
Sensor: Gravity-sensor, Proximity-sensor, Light-sensor, Hall, E-compass
Special Software: E-TOUCH, Smart key (Intelligent Mute Mode etc). Black Screen Gesture
SIM Card: Dual SIM dual standby, dual micro SIM
Quick charge: 5V2A

Network Support:
WiFi: 802.11 a/b/g/n, 2.4G/5G
2G: GSM 850/900/1800/1900MHz
3G: WCDMA 850/900/1900/2100MHz
4G: FDD-LTE 800/900/1800/2100/2600MHz
Price - $219.99


This is what I call a device… I can’t wait to rock this monster

How To Get UK And US Phone Number For Free


Today, i will like to share with you one of the easiest way to get a UK and US phone number for free under 5 minutes. It is totally free, and can be used to make and receive calls from any part of the world.

How To Power All System Apps With Simple Server And MTN BIS

This trick will teach you how to power all system apps with simple server using MTN BIS on PC. Just follow the procedures below

To begin,

Basic Excel keyboard Shortcuts

Microsoft Excel is one of the most popular spreadsheet in recent history. Most people find it difficult and clumsy navigating through Microsoft Excel with their mouse.

Basic Shortcuts for windows 7

1. Managing 'Windows' in Windows 7

 Move and Resize Active Window

Win+Arrow Down   Set window to Restored (if Maximized) or Minimized (if Restored)


Win+Arrow Up   Maximize window (if Restored)
Win+Shift+Arrow Down/Win+Shift+Arrow Up   Maximize Restored window vertically / Restore window to previous state

Recent Posts

Loading...