Unlocking your
Android phone’s bootloader is the first step to
rooting and flashing custom ROMs. And, contrary to popular belief, it’s
actually fully supported on many phones. Here’s how to unlock your
bootloader the official way.
Not Every Phone Will Let You Do This
There are two kinds of phones in this world: Those that let you unlock your bootloader, and those that don’t.
Whether you’re allowed to unlock your bootloader depends on the
manufacturer of your phone, the model you have, and even your carrier.
Nexus phones are all unlockable by nature, and many phones from Motorola
and HTC allow you to unlock your bootloader through a similar process
as the Nexus.
Other phones, however–and some carriers–don’t allow you to unlock
your bootloader the official way, which means you have to wait for
developers to exploit a security vulnerability if you want to root and
flash ROMs. If you have one of those phones, this guide will sadly not
help you.
The best way to find out which category your phone falls into is to browse its section at
XDA Developers.
If you have an HTC or Motorola phone, you may be able too research its
unlockability on HTC or Motorola’s website. If it doesn’t support
unlocking, you’ll have to use an unofficial unlocking or rooting method,
which you’ll usually find on the XDA Developers forums.
If your phone does support unlocking through more official channels, read on.
Step Zero: Back Up Anything You Want to Keep
Before we begin, it’s important to mention: this process will erase
all of your data. So if you have any photos or other files on your phone
that you want to keep, transfer them to your computer now. In addition,
if you have any app settings you want to keep, use their backup
function to create a backup settings file, and transfer those to your
computer as well.
Here’s an extra tip: Since I know I’m eventually going to root my
phone, I always unlock my bootloader as soon as I buy a new device. That
way, I don’t waste time setting it up only to erase the phone in a few
days and do it all over again. If you’re an obsessive Android tweaker
who knows you’re going to root soon, consider unlocking before you go
through the trouble of setting up your phone.
When you’ve backed up everything you want to keep, continue with the steps below.
Step One: Install the Android SDK and Your Phone’s Drivers
You’ll need two things for this process: the Android Debug Bridge,
which is a command line tool for your computer that lets you interface
with your phone, and your phone’s USB drivers. Even if you’ve installed
these before, you should get the latest versions now.
- Head to the Android SDK download page
and scroll down to “SDK Tools Only”. Download the ZIP file for your
platform and unzip it wherever you want to store the ADB files.
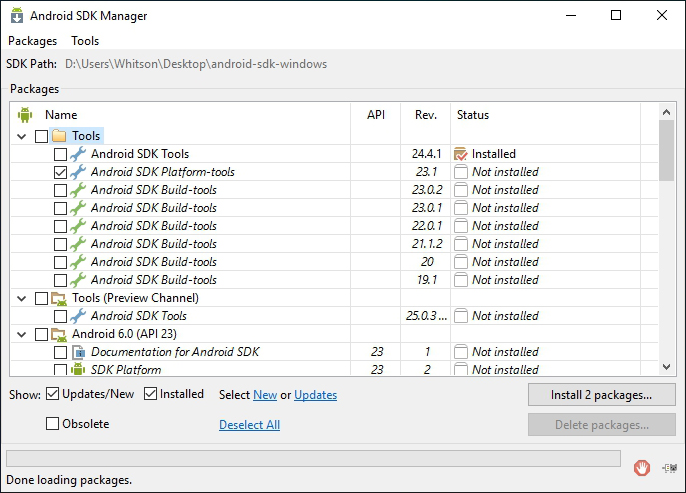
- Start the SDK Manager and deselect everything except “Android SDK
Platform-tools”. If you are using a Nexus phone, you can also select
“Google USB Driver” to download Google’s drivers.
- After it’s finished installing, you can close the SDK manager.
- Install the USB drivers for your phone. You can find these on your phone manufacturer’s website (e.g. Motorola or HTC). If you have a Nexus, you can install the Google drivers you downloaded in step 2 using these instructions.
- Reboot your computer if prompted.
Turn on your phone and plug it into your computer using a USB
cable. Open the platform-tools folder in your Android SDK folder and
Shift+Right Click on an empty area. Choose “Open a Command Prompt Here”,
and run the following command:
If it shows a serial number, your device is recognized and you can
continue with the process. Otherwise, ensure you’ve performed the above
steps correctly.
Step Two: Enable USB Debugging
Next,
you’ll need to enable a few options on your phone. Open your phone’s
app drawer, tap the Settings icon, and select “About Phone”. Scroll all
the way down and tap the “Build Number” item seven times. You should get
a message saying you are now a developer.
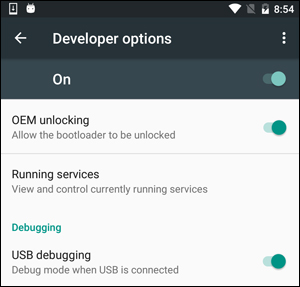
Head back to the main Settings page, and you should see a new option
near the bottom called “Developer Options”. Open that, and enable “OEM
Unlocking”, if the option exists (if it doesn’t, no worries–it’s only
necessary on some phones).
Next, enable “USB Debugging”. Enter your password or PIN when prompted, if applicable.
Once that’s done, connect your phone to your computer. You should see
a popup entitled “Allow USB Debugging?” on your phone. Check the
“Always allow from this computer” box and tap OK.
Step Three: Get an Unlock Key (for Non-Nexus Phones)
If you’re using a Nexus device, you can skip the following step.
Non-Nexus devices will likely need to go through one extra step before
you continue.
Head to your manufacturer’s bootloader unlocking page (for example,
this page for Motorola phones or
this page for HTC phones), choose your device (if prompted), and log in or create an account.
The rest of this step is a bit different depending on your phone, but
the manufacturer’s site should walk you through the process. It will go
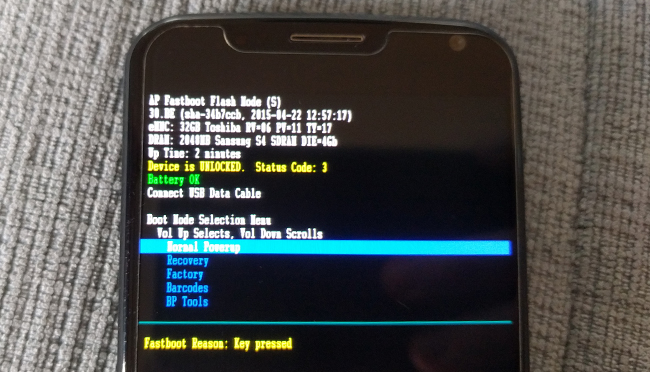
something like this: First, turn off your phone and boot into fastboot
mode. This is a bit different on every phone, but on most modern
devices, you can get there by holding the “Power” and “Volume Down”
buttons for 10 seconds. Release them, and you should be in fastboot
mode. (HTC users will need to select “Fastboot” with the Volume Down key
and press power to select it first.) You can usually find more
information on your specific phone with a quick Google search, so feel
free to do that now before continuing.

Connect your phone to your PC with a USB cable. Your phone should
indicate that the device is connected. On your computer, open the
platform-tools folder in your Android SDK folder and Shift+Right Click
on an empty area. Choose “Open a Command Prompt Here”, and use that
Command Prompt window to retrieve your unlock key as described by your
manufacturer. (For example, Motorola phones will run the fastboot oem get_unlock_data command, while HTC phones will run the fastboot oem get_identifier_token command.)
The Command Prompt will spit out a token in the form of a very long
string of characters. Select it, copy it, and paste it into the
applicable box on your manufacturer’s website–make sure there are no
spaces!–and submit the form. If your device is unlockable, you’ll
receive an email with a key or file that you’ll use in the next step.
If your device is not unlockable, you’ll get a message stating so. If
you want to root your device or flash a ROM, you’ll need to use a more
unofficial method, which you can usually find on a site like
XDA Developers.
Step Four: Unlock Your Phone
Now you’re ready to actually perform the unlock. If your phone is
still in fastboot mode, run the command below. If not, turn off your
phone and hold the “Power” and “Volume Down” buttons for 10 seconds.
Release them, and you should be in fastboot mode. (HTC users will need
to select “Fastboot” with the Volume Down key and press power to select
it first.) Connect your phone to your PC with a USB cable.
On your computer, open the platform-tools folder in your Android SDK
folder and Shift+Right Click on an empty area. Choose “Open a Command
Prompt Here”.
To unlock your device, you’ll need to run one simple command. For most Nexus devices, this command is:
If you have a newer Nexus, such as the Nexus 5X or 6P, the command will be slightly different:
If you have a non-Nexus device, your manufacturer will tell you what command to run. Motorola devices, for example, need to run fastboot oem unlock UNIQUE_KEY, using the unique key from the email you received. HTC devices will run fastboot oem unlocktoken Unlock_code.bin using the Unlock_code.bin file you received from HTC.
After running the command, your phone may ask if you are sure you want to unlock. Use the volume keys to confirm.
When you’re finished, use the on-screen menu to reboot your phone (or run the fastboot reboot command
from your PC). If everything worked correctly, you should see a new
message at boot stating that your bootloader is unlocked, and after a
few seconds it should boot into Android. It’s important that you boot
into Android before doing anything else, like flashing a custom
recovery.
Congratulations on unlocking your phone! You won’t notice much of a
difference yet, but with an unlocked bootloader you’ll be able to
flash a custom recovery, opening the door to root access and custom ROMs.
Source
:How-To Geek


 Call us With: 07069039666 |
  BBM PIN: 5922C082